


Mục lục
- Thiết kế
- Yêu cầu
- Giải pháp
- Điều kiện trước tiên
- Cài đặt AWS CDK project
- DynamoDB
- Tiến hành tạo bảng mapping-table với partition_key là id
- Deploy với AWS CDK
- Lambda & API Gateway
- Tạo folder chứa code cho lambda function
- Viết hàm xử lý handler.py cho lambda function
- Thêm hàm Lambda, APIGateway vào stack và phân quyền phù hợp
- Deploy với AWS CDK CLI
- Test
- API Gateway & Custom domain
- Tạo hosted zone trên Route53
- Cài đặt biến môi trường
- AWS Route53 Hosted Zone, Targets và AWS Certificate Manager
- Demo
- References
Thiết kế
Yêu cầu
- API tạo URL rút gọn: input là URL cần rút gọn, output là URL được rút gọn
- API đọc URL rút gọn: input là URL được rút gọn
- redirect tới trang cần được rút gọn
- trả về lỗi nếu URL không tồn tại
Giải pháp

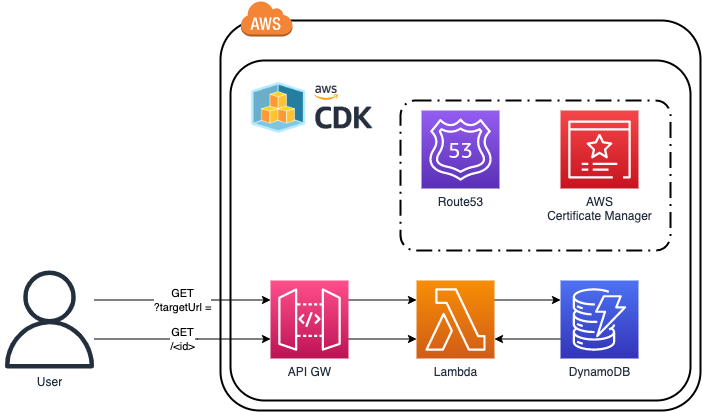
- Gồm 3 thành phần chính:
- API Gateway: API endpoint, nhận request từ user và chuyển cho Lambda funtion xử lý
- Lambda funtion: Xử lý logic đọc, ghi URL
- DynamoDB: Lưu trữ dữ liệu URL đã được rút gọn
Ngoài ra có nếu có thêm Route53 Hosted Zone và AWS Certificate Manager cho tuỳ chọn gắn API Gateway với custom domain.
Điều kiện trước tiên
Trước khi bắt đầu các bạn nên :
- AWS CDK (có thể tham khảo Hướng dẫn chi tiết cài đặt AWS CDK)
- Cài đặt AWS CLI và cài đặt AWS profile (có thể tham khảo hướng dẫn tại đây)
Cài đặt AWS CDK project
Sau khi cài đặt profile AWS CLI và AWS CDK, chúng ta tạo project AWS CDK python để xây dựng ứng dụng AWS CDK.
mkdir url-shortener
cdk init --language python
# cài đặt môi trường ảo
python3 -m venv .venv
source .venv/bin/activate
# cài đặt các dependencies cần thiết
pip install -r requirements.txt
Cấu trúc file sau khi project được tạo
./
├── README.md
├── app.py
├── cdk.json
├── requirements-dev.txt
├── requirements.txt
├── source.bat
├── tests
│   ├── __init__.py
│   └── unit
│       ├── __init__.py
│       └── test_url_shortener_stack.py
└── url_shortener
    ├── __init__.py
    └── url_shortener_stack.py
DynamoDB
Tiến hành tạo bảng mapping-table với partition_key là id
from aws_cdk import (
    Stack,
    aws_dynamodb as dynamodb,
)
from constructs import Construct


class UrlShortenerStack(Stack):

    def __init__(self, scope: Construct, construct_id: str, **kwargs) -> None:
        super().__init__(scope, construct_id, **kwargs)

        table = dynamodb.Table(self, "mapping-table",
                               partition_key=dynamodb.Attribute(
                                   name="id", type=dynamodb.AttributeType.STRING)
                               )
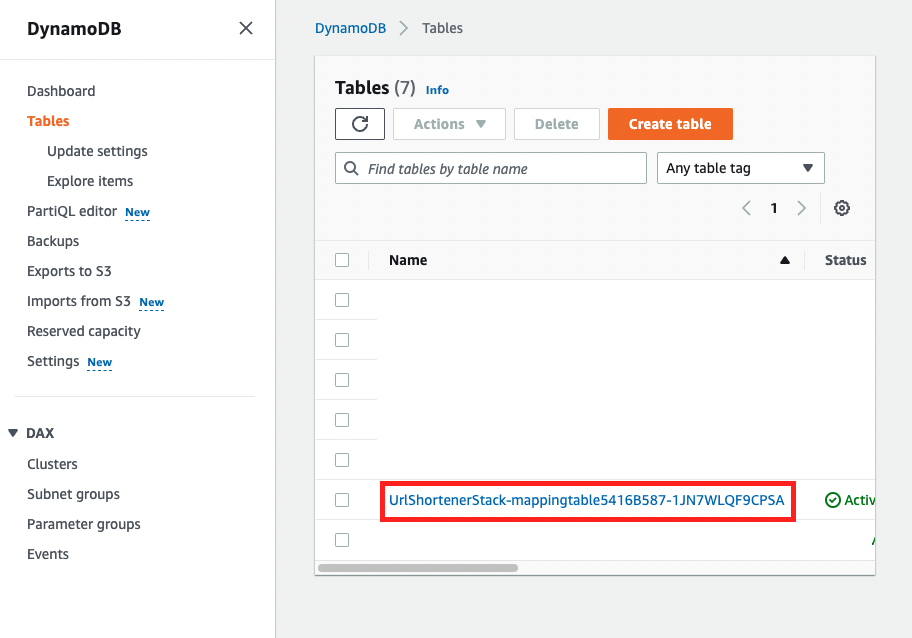
Deploy với AWS CDK
cdk deploy
Khi kiểm tra trên AWS console, chúng ta thấy DynamoDB table đã được tạo

Lambda & API Gateway
Tạo folder chứa code cho lambda function
mkdir lambda
touch handler.py
Viết hàm xử lý handler.py cho lambda function
import logging
import json
import os
import uuid
import boto3

LOG = logging.getLogger()
LOG.setLevel(logging.INFO)


def main(event, context):
    LOG.info(f"EVENT: + {json.dumps(event)}")

    query_string_params = event["queryStringParameters"]
    if query_string_params is not None and 'targetUrl' in query_string_params:
        target_url = query_string_params['targetUrl']
        if target_url is not None:
            return create_short_url(event)

    path_parameters = event['pathParameters']
    if path_parameters is not None:
        if path_parameters['proxy'] is not None:
            return read_short_url(event)

    return {
        'statusCode': 200,
        'body': 'usage: ?targetUrl=URL'
    }


# Tạo URL
def create_short_url(event):

    target_url = event['queryStringParameters']['targetUrl']

    id = str(uuid.uuid4())[0:8]

    table_name = os.environ.get('TABLE_NAME')
    dynamo_db = boto3.resource('dynamodb')
    table = dynamo_db.Table(table_name)

    table.put_item(
        Item={
            'id': id,
            'target_url': target_url,
        }
    )
    url = "https://" \
        + event["requestContext"]["domainName"] \
        + event["requestContext"]["path"] \
        + id

    return {
        'statusCode': 200,
        'headers': {'Content-Type': 'text/plain'},
        'body': "Created URL: %s" % url
    }


# Redirect tới URL đã được tạo
def read_short_url(event):
    id = event['pathParameters']['proxy']

    table_name = os.environ.get('TABLE_NAME')
    dynamo_db = boto3.resource('dynamodb')
    table = dynamo_db.Table(table_name)

    response = table.get_item(Key={'id': id})
    LOG.debug("RESPONSE: " + json.dumps(response))

    item = response.get('Item', None)
    if item is None:
        return {
            'statusCode': 400,
            'headers': {'Content-Type': 'text/plain'},
            'body': 'No redirect found for ' + id
        }

    return {
        'statusCode': 301,
        'headers': {
            'Location': item.get('target_url')
        }
    }
Thêm hàm Lambda, APIGateway vào stack và phân quyền phù hợp
from aws_cdk import (
    Stack,
    aws_dynamodb as dynamodb,
    aws_lambda as lambda_,
    aws_apigateway as apigw,
)
from constructs import Construct
import os

class UrlShortenerStack(Stack):

    def __init__(self, scope: Construct, construct_id: str, **kwargs) -> None:
        super().__init__(scope, construct_id, **kwargs)

        # DynamoDB table
        table = dynamodb.Table(self, "mapping-table",
                               partition_key=dynamodb.Attribute(
                                   name="id", type=dynamodb.AttributeType.STRING)
                               )

        # Lambda Function
        function = lambda_.Function(self, "backend",
                                    runtime=lambda_.Runtime.PYTHON_3_9,
                                    handler="handler.main",
                                    code=lambda_.Code.from_asset("./lambda")
                                    )
        # Cấp quyền đọc, ghi vào DynamoDB table cho lambda function mới được tạo
        table.grant_read_write_data(function)
        # Add ENV to lambda function
        function.add_environment("TABLE_NAME", table.table_name)

        # API gateway
        api = apigw.LambdaRestApi(self, "api", handler=function)
grant_read_write_datasẽ cấp quyền đọc và ghi của dynamodb table cho lambda function, một lần nữa AWS CDK chức tỏ tính ưu việt khi làm điều này với 1 dòng lệnh thay vì phải mapping phức tạp khi sử dụng CloudFormation template.add_environmenttạo biến môi trường cho Lambda functionLambdaRestApithêm một oneliner của AWS CDK cho việc tạp Rest API cho Lambda funtion + tạo API Gateway và map 2 thứ lại với nhau 😎
Deploy với AWS CDK CLI
- Chạy lệnh
diffđể thấy được changeset của stack
cdk diff

# 👇 output
Stack UrlShortenerStack
IAM Statement Changes
┌───┬──────────────────────┬────────┬───────────────────────────────────────────────┬───────────────────────────────────────────────┬───────────┐
│   │ Resource             │ Effect │ Action                                        │ Principal                                     │ Condition │
├───┼──────────────────────┼────────┼───────────────────────────────────────────────┼───────────────────────────────────────────────┼───────────┤
│ + │ ${mapping-table.Arn} │ Allow  │ dynamodb:BatchGetItem                         │ AWS:${backend/ServiceRole}                    │           │
│   │                      │        │ dynamodb:BatchWriteItem                       │                                               │           │
│   │                      │        │ dynamodb:ConditionCheckItem                   │                                               │           │
│   │                      │        │ dynamodb:DeleteItem                           │                                               │           │
│   │                      │        │ dynamodb:DescribeTable                        │                                               │           │
│   │                      │        │ dynamodb:GetItem                              │                                               │           │
│   │                      │        │ dynamodb:GetRecords                           │                                               │           │
│   │                      │        │ dynamodb:GetShardIterator                     │                                               │           │
│   │                      │        │ dynamodb:PutItem                              │                                               │           │
│   │                      │        │ dynamodb:Query                                │                                               │           │
│   │                      │        │ dynamodb:Scan                                 │                                               │           │
│   │                      │        │ dynamodb:UpdateItem                           │                                               │           │
└───┴──────────────────────┴────────┴───────────────────────────────────────────────┴───────────────────────────────────────────────┴───────────┘
(NOTE: There may be security-related changes not in this list. See https://github.com/aws/aws-cdk/issues/1299)

Resources
[+] AWS::IAM::Policy backend/ServiceRole/DefaultPolicy backendServiceRoleDefaultPolicyxxx
[~] AWS::Lambda::Function backend backendCBA98286
 ├─ [+] Environment
 │   └─ {"Variables":{"TABLE_NAME":{"Ref":"mappingtablexxx"}}}
 └─ [~] DependsOn
     └─ @@ -1,3 +1,4 @@
        [ ] [
        [+]   "backendServiceRoleDefaultPolicyxxx",
        [ ]   "backendServiceRolexxx"
        [ ] ]
- Deloy stack lên AWS Cloud
cdk deploy

# 👇 output
...
 ✅  UrlShortenerStack

✨  Deployment time: 51.6s

Outputs:
UrlShortenerStack.apiEndpoint9349E63C = https://xxx.execute-api.ap-southeast-1.amazonaws.com/prod/
Stack ARN:
arn:aws:cloudformation:ap-southeast-1:xxx:stack/UrlShortenerStack/xxxx
Test
- Bạn có thể thử sử dụng ứng dụng này với URL trong phần output
curl https://xxx.execute-api.ap-southeast-1.amazonaws.com/prod/\?targetUrl\=https://vntechies.dev/
# 👇 output
Created URL: https://xxx.execute-api.ap-southeast-1.amazonaws.com/prod/7deb07cb

curl https://xxx.execute-api.ap-southeast-1.amazonaws.com/prod/7deb07cb -v
# 👇 output
...
< HTTP/2 301
< content-type: application/json
< content-length: 0
< location: https://vntechies.dev/
...
Vậy là chúng ta đã hoàn thành việc xây dựng ứng dụng rút gọn URL sử dụng API Gateway, Lambda và DynamoDB được triển khai nhờ AWS CDK. Nếu bạn muốn tiếp tục sử dụng với custom domain, bạn có thể tiếp tục làm theo bước sau.
API Gateway & Custom domain
Tạo hosted zone trên Route53
- Bạn cần có một tên miền và tạo hosted zone trên AWS Route53 bằng console với tên miền đó. Hướng dẫn cụ thể bạn có thể tham khảo tại đây
Cài đặt biến môi trường
- Sau khi hoàn tất việc tạp hosted zone với custom domain, bạn cần cài đặt biến môi trường (hãy export các biến tại session bạn chạy AWS CDK CLI)
- Nếu bạn sử dụng CI/CD pipeline khi triển khai ứng dụng AWS CDK, hãy chắc chắn cài đặt các biến môi trường trước đó
AWS Route53 Hosted Zone, Targets và AWS Certificate Manager

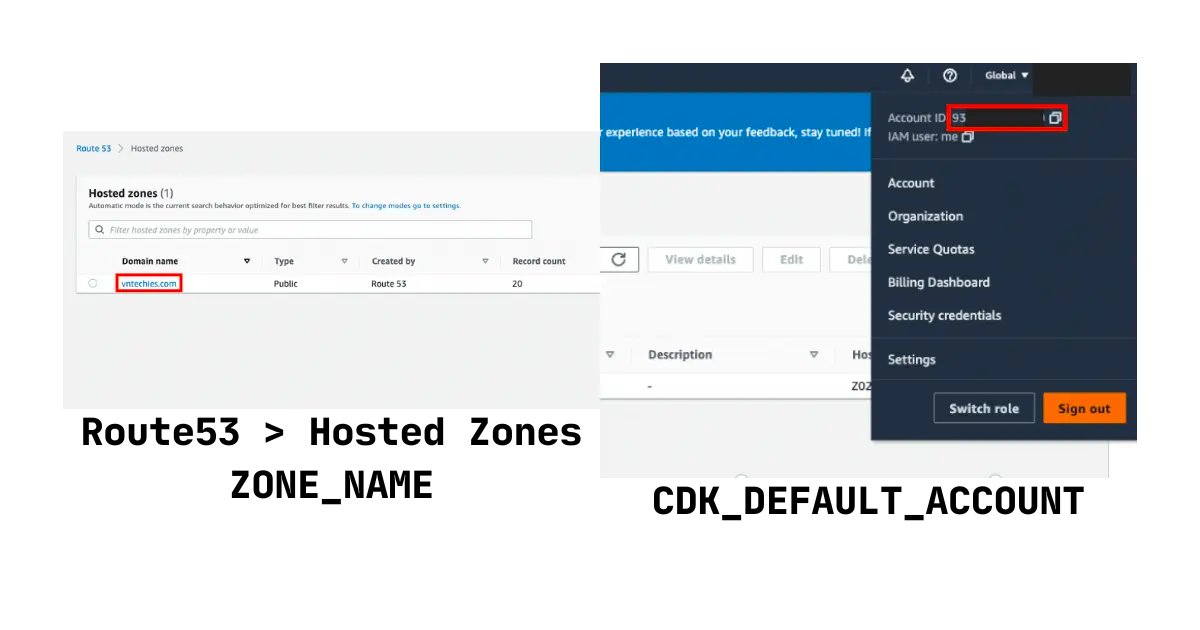
export ZONE_NAME='vntechies.dev' # thay bằng domain của bạn
export CDK_DEFAULT_ACCOUNT='xxx'
export CDK_DEFAULT_REGION='ap-southeast-1'
from aws_cdk import (
Stack,
aws_dynamodb as dynamodb,
aws_lambda as lambda_,
aws_apigateway as apigw,
aws_route53 as route53,
aws_route53_targets as targets,
aws_certificatemanager as acm,
)
from constructs import Construct
import os
ZONE_NAME = os.getenv('ZONE_NAME')
class UrlShortenerStack(Stack):
def __init__(self, scope: Construct, construct_id: str, **kwargs) -> None:
super().__init__(scope, construct_id, **kwargs)
# DynamoDB table
table = dynamodb.Table(self, "mapping-table",
partition_key=dynamodb.Attribute(
name="id", type=dynamodb.AttributeType.STRING)
)
# Lambda Function
function = lambda_.Function(self, "backend",
runtime=lambda_.Runtime.PYTHON_3_9,
handler="handler.main",
code=lambda_.Code.from_asset("./lambda")
)
# Cấp quyền đọc, ghi vào DynamoDB table cho lambda function mới được tạo
table.grant_read_write_data(function)
# Add ENV to lambda function
function.add_environment("TABLE_NAME", table.table_name)
# API gateway
api = apigw.LambdaRestApi(self, "api", handler=function)
# Map API gateway với custom domain
self.map_subdomain("go", api)
def map_subdomain(self, subdomain: str, api: apigw.RestApi) -> str:
"""
Maps a sub-domain of {domain_name} to an API gateway
:param subdomain: The sub-domain (e.g. "www")
:param api: The API gateway endpoint
:return: The base url (e.g. "https://www.{domain_name}")
"""
domain_name = subdomain + '.' + ZONE_NAME
url = 'https://' + domain_name
# Lấy hosted zone vừa mới tạo
hosted_zone = route53.HostedZone.from_lookup(self, "zone",
domain_name=ZONE_NAME
)
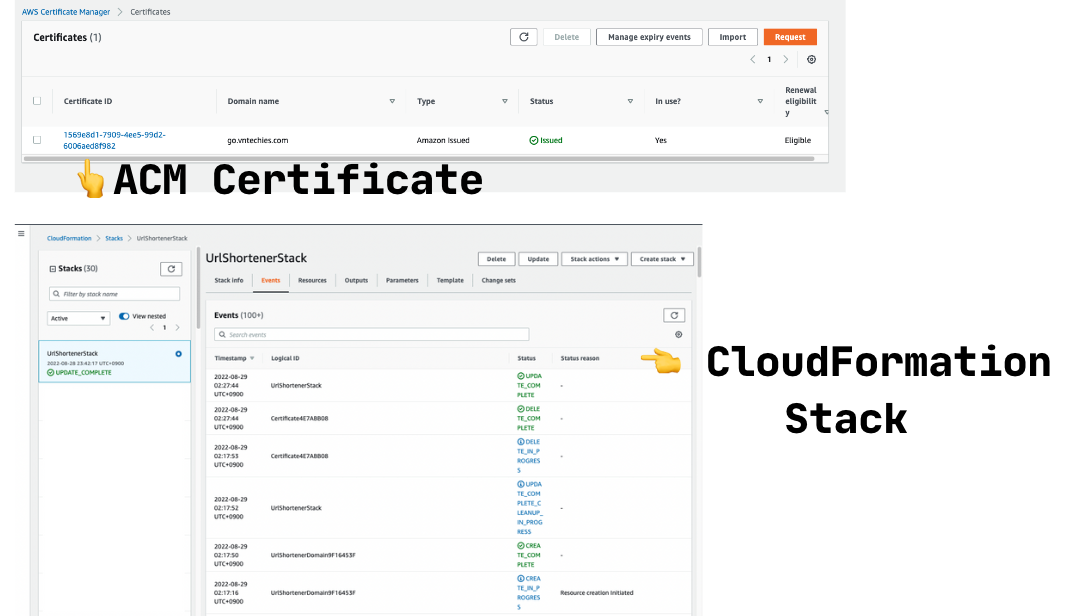
# Tạo một certificate mới cho custom domain
cert = acm.Certificate(self, "Certificate",
domain_name=domain_name,
validation=acm.CertificateValidation.from_dns(
hosted_zone)
)
# Add domain vào API và tạo một A record tại hosted zone trên Route53
domain = api.add_domain_name(
'Domain', certificate=cert, domain_name=domain_name)
route53.ARecord(
self, 'UrlShortenerDomain',
record_name=subdomain,
zone=hosted_zone,
target=route53.RecordTarget.from_alias(targets.ApiGatewayDomain(domain)))
return url
HostedZone.from_lookuptìm hosted zone theo config tên miền (domain_name)acm.CertificateValidation.from_dnssẽ tự động tạo một dns record cho việc chứng thực quyền sở hữu tên miền trên hosted zone của bạn, nếu bạn không quản lý tên miền bằng Route53, bạn cần tạo record này một cách thủ công.
Sau khi hoàn tất việc chuẩn bị source code, chúng ta có thể deploy stack lên AWS Cloud
cdk deploy

Demo
Sau khi truy cập vào URL rút gọn được đã tạo, chúng ta sẽ được redirect tới trang đã được yêu cầu trước đó. Vậy là ứng dụng rút gọn URL nhỏ gọn đã được hoàn thành.
Tuy bài hướng dẫn này chỉ xây dựng một ứng dụng đơn giản, nhưng bạn có thể thấy việc sử dụng AWS CDK đã rút gọn đáng kể thời gian triển khai các tài nguyên trên AWS và giúp bạn có thể tập trung vào logic của ứng dụng. Hãy thử bắt đầu sử dụng ngay từ bây giờ bạn nhé 😉